
Even though there is enough gluten – the protein that builds structure and allows bread to rise – in rye flour to make yeast-leavened bread, it is often supplemented with wheat flour for making bread. That is because the gluten in rye flour differs from that in wheat flour, making it more difficult to make good dough. So, it is that in the following recipe for rye bread, there is actually more wheat flour.
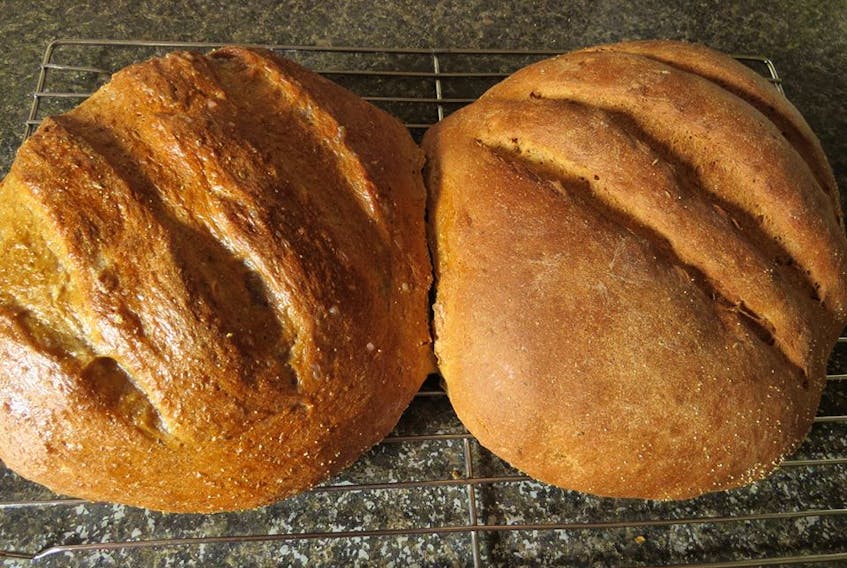
I baked this bread last week using dark rye flour. The colour of rye flour is determined by the part of the grain that is ground to make flour; the outer layers of the rye berry contain more dark pigment.
Dough made with rye flour is somewhat sticky; I found this even in dough in which there was twice as much wheat flour as rye by volume.
Really dark rye breads are coloured, not only by the flour but also by the addition of molasses and, sometimes, caramel colouring. The loaves that I made were darker in colour than light rye but lighter than most dark rye breads because I substituted molasses for the honey.
Other substitutions: I replaced the shortening with melted and cooled butter, and I used about 15 mL (1 tbsp) caraway seeds, half of the amount the recipe suggested because that’s all I had.
In the interest of science, I brushed one loaf with a cornstarch glaze (instructions follow, after the bread recipe) and left one au naturel. The glossy glaze accentuated the warm brown colour of the crust and made the loaf look prettier than the unglazed loaf. See the image on Facebook.com/IslandGusto.
I was interested to see that when I brushed one of the loaves with glaze before putting it in the oven, its volume decreased, and it was noticeably smaller than the unglazed loaf. However, it caught up in the heat of the oven, and the baked loaves were the same size.
Rye Bread
Adapted from Gill, Janice Murray: Canadian Bread Book, McGraw-Hill Ryerson Limited, Toronto, 1980
30 mL (2 tbsp) dried yeast
625 mL (2½ cups) lukewarm water
50 mL (¼ cup) honey
15 mL (1 tbsp) salt
30 mL (2 tbsp) melted and cooled shortening
625 mL (2½ cups) rye flour
1.25-1.5 L (5-6 cups) all purpose flour
30 mL (2 tbsp) caraway seeds (optional)
Proof the yeast in the lukewarm water with the honey. When it has bubbled up well, add the salt and shortening. Stir well.
Add the rye flour and caraway seeds, if using, and beat well. Add enough white flour to make a soft dough. Knead until smooth and elastic, adding more flour to keep dough from sticking.
Place in greased bowl; cover and leave to rise till double or just a little bit more.
Punch dough down, knead for two or three minutes and leave to rest covered with the bowl.
Shape into two hemispherical loaves. To do this, divide the dough into two equal pieces; a kitchen scale makes this easy. Knead each one briskly for five or six turns to firm up the gluten and make it elastic. Shape into a round ball by pulling together the two ends of the oval left by kneading. Place on a baking sheet sprinkled with cornmeal. Cover with a damp tea towel and let rise till double.
With a razor blade or sharp knife make several crosswise cuts on the surface of the dough. Let rise a few more minutes.
Bake in 200 C (400 F) oven for 35 minutes, glazing if desired with potato or cornstarch glaze. Cool on rack.
Starch Glaze
Mix 25 mL (5 tsp) of cornstarch or potato starch with enough boiling water to make a mixture that, when cooked, is still soft enough to brush on the bread. (Note: the original recipe calls for 100 mL, but I had to whisk in quite a bit more to make a mixture soft enough to brush. I recommend thinning it a little while hot; the mixture firms up as it cools, making it difficult to keep lumps from forming if stirring water into the cooled mixture.)
Brush on the loaf before placing in the oven, twice during the last half of the baking time and once again after removing the bread from the oven.
Margaret Prouse, a home economist, writes this column for The Guardian every Friday. She can be reached at [email protected].